

Okta
Connect Okta to Trustle to get insight into over-privileged accounts and unused accounts, and to adopt just-in-time access management.
Prerequisites
Section titled “Prerequisites”- An Okta account with the Super Admin role. Only Super Admins can grant API scopes to an app.
- Access to the Okta Admin Console.
Configure Okta
Section titled “Configure Okta”Step 1: Create an App Integration
Section titled “Step 1: Create an App Integration”-
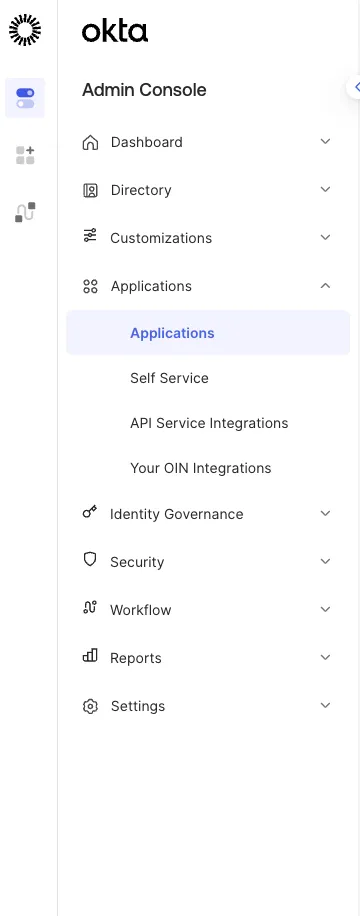
From the Admin Console, select Applications, then Applications again from the left menu.
-
Click Create App Integration.

-
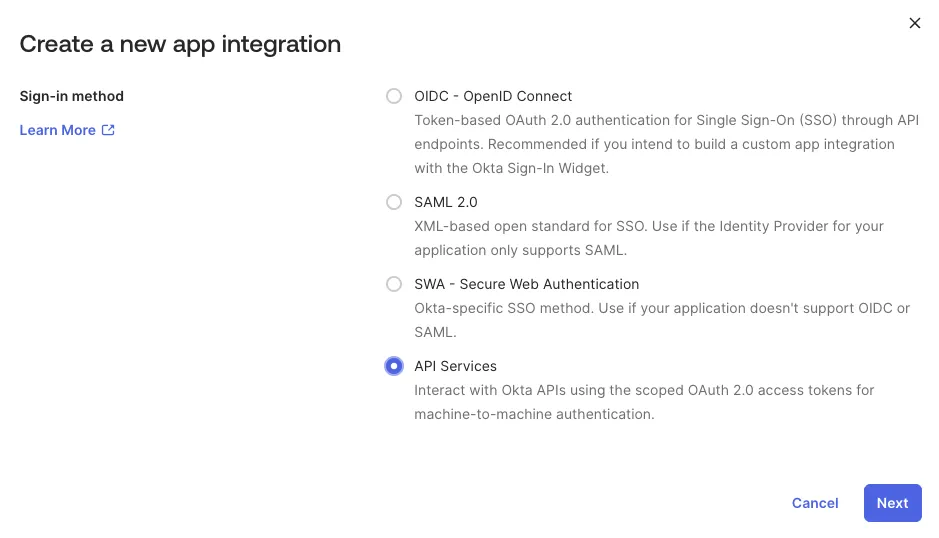
Choose the API Services option and click Next.
-
Give the app integration a name and click Next.
-
Okta opens the app integration configuration page.
Step 2: Generate a Private Key
Section titled “Step 2: Generate a Private Key”- On the app integration configuration page, select the General tab.
- In the Client Credentials section, click Edit.
- Under Client Authentication, select Public Key / Private Key.
- In the Public Keys section, click Add Key.
- In the Add a public key dialog, click Generate New Key.
- Select For client authentication (sig) from the dropdown.
- Copy the private key immediately in JSON format (JWK). Okta shows it only once and does not store it. Copy the entire JSON object, not the PEM format.
- Store the private key securely. You need it in Step 4.
- Click Done.
- Click Save on the General tab.
Step 3: Grant the Application Okta API Scopes
Section titled “Step 3: Grant the Application Okta API Scopes”- On the app integration configuration page, select the Okta API Scopes tab.
- Grant the following scopes to the application:
okta.groups.readokta.groups.manageokta.users.readokta.users.manage
- Return to the General tab and note the Client ID and your Okta Domain. Find the domain in the URL. It typically looks like
organization.okta.com.
Step 4: Collect Credentials
Section titled “Step 4: Collect Credentials”Collect these values from the app integration configuration page:
- Organization URL: the URL in your browser’s address bar when you are logged into the Okta Admin Console, for example
https://your-org.okta.com. Include thehttps://prefix. - Client ID: on the General tab, in the Client Credentials section.
- Private Key: the private key you copied in Step 2, in JSON format. Trustle uses the private key, not the client secret, to authenticate.
Connect in Trustle
Section titled “Connect in Trustle”- Go to the Connections page in Trustle from the left menu.
- Under Identity Providers, find the Okta logo and choose Connect.
- Fill in the connection form:
- Connection Name: enter a descriptive name, for example
My Okta Connection. - Description: optional. Enter a description.
- Org URL: paste the organization URL you collected.
- Client ID: paste the client ID you collected.
- Private Key: paste the private key you collected, in JSON format.
- Connection Name: enter a descriptive name, for example
- If you want to use Okta as your Trustle identity provider, check Use as Identity Provider.
- Click Test Connection.
- After the test succeeds, click Save Connection.