

Microsoft Entra ID
Trustle registers an application in your Microsoft Entra ID (formerly Azure AD) tenant to analyze your Microsoft environment. The app registration lets Trustle analyze user access patterns and manage group memberships across your Microsoft environment.
Prerequisites
Section titled “Prerequisites”- Global Administrator access to your Microsoft Entra ID tenant.
- Ability to create an application registration and copy these values for Trustle setup:
- The tenant ID
- The application (client) ID
- The client secret
Configure Microsoft Entra ID
Section titled “Configure Microsoft Entra ID”Step 1: Gather your Microsoft environment information
Section titled “Step 1: Gather your Microsoft environment information”Trustle needs your Microsoft environment structure to configure this integration.
- Sign in to the Microsoft Entra Admin Center.
- Go to https://entra.microsoft.com.
- Sign in with your Global Administrator account.
- Find your tenant ID.
- In the left sidebar, click Overview.
- Under Basic information, locate the Tenant ID. It has a GUID format, for example
12345678-1234-1234-1234-123456789012. - Copy this ID. You’ll enter it into Trustle.
- Record your primary domain.
- In the same Overview section, note your Primary domain. It looks like
yourcompany.onmicrosoft.comor your custom domain.
- In the same Overview section, note your Primary domain. It looks like
This information helps Trustle cover all users, groups, and applications in your organization.
Step 2: Create the app registration
Section titled “Step 2: Create the app registration”Create an app registration for Trustle with the permissions it needs to manage your Microsoft environment.
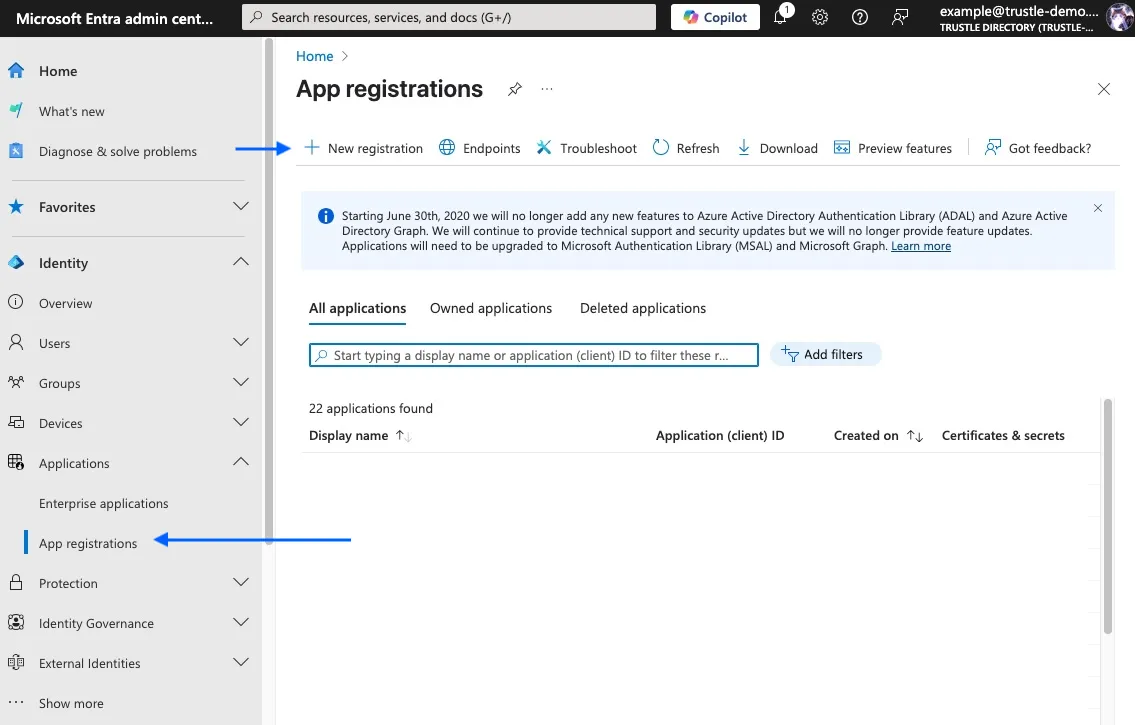
- Navigate to app registrations.
- In the Entra Admin Center, go to Applications > App registrations.
- Click New registration.
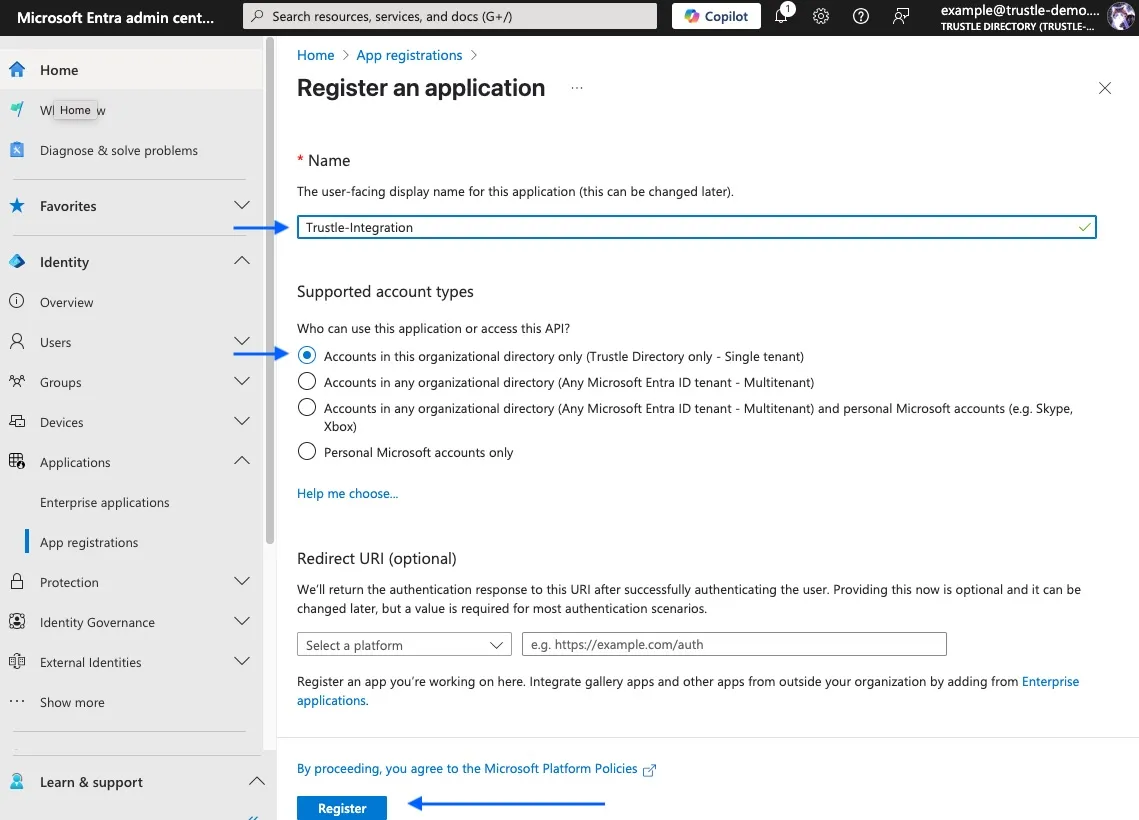
- Configure the basic registration.
- Name: enter
Trustle-Integration(or a similar descriptive name). - Supported account types: select Accounts in this organizational directory only (single tenant).
- Redirect URI: leave this blank. Trustle doesn’t need it.
- Click Register.
- Name: enter
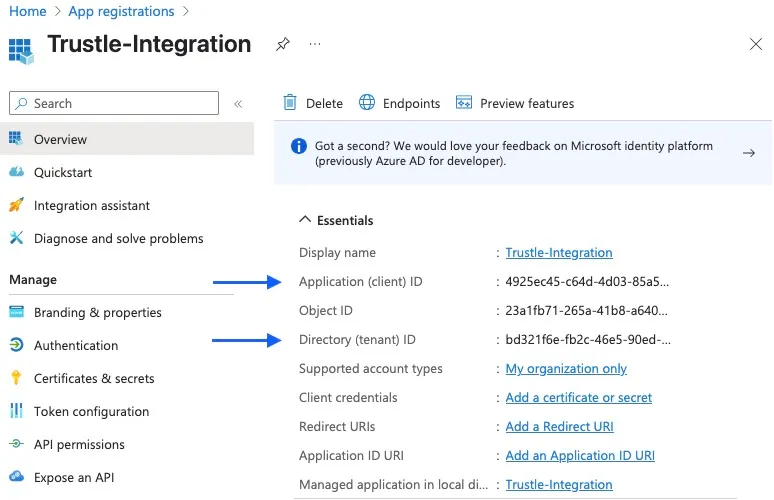
- Record the application information.
- After creation, the app overview page opens.
- Copy and save the Application (client) ID, for example
09e9d206-afc7-4192-8283-697ae865ee00. - Copy and save the Directory (tenant) ID. It should match the tenant ID from step 1.
- You’ll enter these values in the Trustle UI.
Step 3: Create a client secret for authentication
Section titled “Step 3: Create a client secret for authentication”The app registration needs credentials to authenticate with Microsoft APIs.
- Navigate to certificates and secrets.
- In your app registration, click Certificates & secrets in the left menu.
- Click New client secret.
- Configure the secret.
- Description: enter
Trustle-ClientSecret. - Expires: select 24 months (recommended for stability).
- Click Add.
- Description: enter
- Copy the secret value.
- Immediately copy the Value field. Don’t copy the Secret ID.
- The value looks like
abc123def456ghi789~jkl012mno345pqr678. - Trustle shows this value only once. Store it securely.
- You’ll enter this value into Trustle along with the client ID.
Step 4: Configure required Microsoft Graph API permissions
Section titled “Step 4: Configure required Microsoft Graph API permissions”This step grants the permissions Trustle needs to analyze and manage your Microsoft Entra ID environment.
- Navigate to API permissions.
- In your app registration, click API permissions in the left menu.
- Microsoft Graph appears with basic permissions already present.
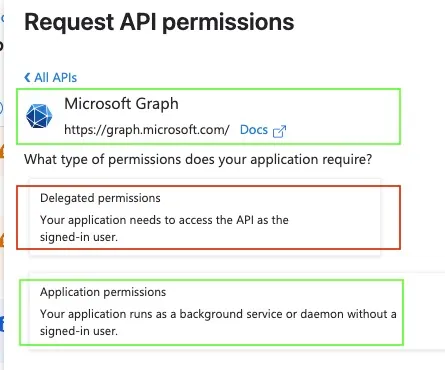
- Add Microsoft Graph permissions.
- Click Add a permission.
- Select Microsoft Graph.
- Choose Application permissions. Don’t choose Delegated permissions.
-
Add each required permission. Search for and select these permissions one by one.
Permission Purpose User.Read.AllRead user profiles and account status. Group.Read.AllRead group properties and membership. GroupMember.ReadWrite.AllAdd and remove group members. Application.Read.AllRead app registrations and service principals. AppRoleAssignment.ReadWrite.AllRead and manage app role assignments. AuditLog.Read.AllRead sign-in logs and audit events. Directory.Read.AllRead tenant-level directory data. RoleManagement.ReadWrite.DirectoryRead and manage Microsoft Entra directory role assignments. -
Grant admin consent.
- After you add all permissions, click Grant admin consent for [Your Organization].
- Click Yes to confirm.
- Verify all permissions show Granted for [Your Organization] with green checkmarks.
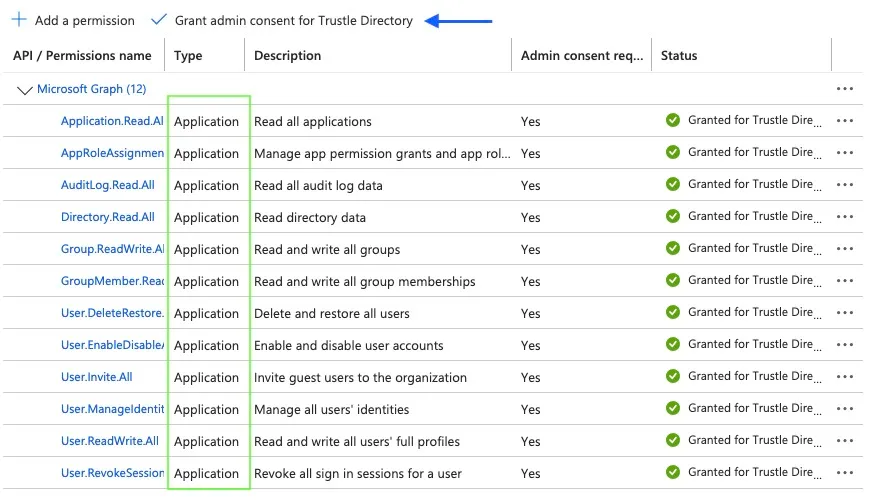
These permissions let Trustle:
- Read user profiles and account status.
- Read and manage group memberships.
- Read app registrations and role assignments.
- Read sign-in logs and audit events for access patterns.
- Read and manage Microsoft Entra directory role assignments.
Step 5 (optional): Test and verify configuration
Section titled “Step 5 (optional): Test and verify configuration”Confirm everything is configured correctly before you enter credentials into Trustle.
- Verify the app registration.
- In App registrations, confirm your app exists.
- Check that all required API permissions are granted with admin consent.
- Verify the client secret is created and saved.
- Test permission access.
- In your app registration, go to API permissions.
- All permissions should show Granted for [Organization] status.
- No permissions should show Not granted or require additional consent.
- Verify the directory role assignment.
- Go to Roles and administrators > Directory Readers.
- Confirm your app registration appears in the assignments.
Your app registration now has:
- Read access to users: profile and status information.
- Read and update access to groups: group memberships.
- Read access to applications: service principals and role assignments.
- Audit log access: sign-in patterns and security events.
- Directory information: tenant-level organizational data and directory roles.
If you also want to connect Azure, continue with the Azure-specific setup on that page. It reuses this same app registration.
Connect in Trustle
Section titled “Connect in Trustle”Once setup is complete, enter this information into Trustle:
Tenant ID(Directory ID)Application (Client) IDClient Secretvalue
Verify
Section titled “Verify”After you connect, Trustle:
- Imports group memberships and role assignments for all accounts (initial discovery).
- Analyzes 30 days of activity and identifies unused permissions and users.
- Populates the IAM dashboard with the findings.
- Runs periodic imports and analysis to show any changes in these findings (ongoing monitoring).
Troubleshooting
Section titled “Troubleshooting”If you run into issues during setup:
- Permission consent errors: use a Global Administrator account.
- Missing client secret: this value only shows once. Recreate it if you lose it.
- API permission: verify all permissions are Application type, granted, and approved.
Contact Trustle technical support with specific error messages. Provide:
- Your tenant ID and application ID for faster troubleshooting.
- Screenshots or audit log samples, if available.
- Error messages or descriptions.